To build a homemade Frisbee golf basket, assemble a sturdy base and attach chains to a metal frame to catch discs. Use materials like PVC, metal rods, and a heavy-duty net for construction.
Disc golf enthusiasts often seek creative ways to enhance their game outside the official courses. Crafting a personal Frisbee golf basket brings the game to your backyard, offering endless hours of fun and practice. This DIY project appeals to players who want a cost-effective alternative to commercial baskets and the satisfaction of playing with something built with their own hands.
The process includes designing a base, constructing the catching area, and ensuring proper stability for outdoor conditions. With basic tools and some handiwork, you can create a functional and durable Frisbee golf basket that mimics professional standards.
Credit: chascrazycreations.com
Essentials Of A Frisbee Golf Basket
Before creating your own frisbee golf basket, it’s important to understand its essentials.
A sturdy base, a basket, and chains form the core of any good frisbee golf basket.
Safety and durability should be top priorities.
Materials Overview
The materials chosen should withstand outdoor conditions.
- Metal pole for the center structure – height regulation is 52 inches
- Metal chains – number of chains varies, but 12 to 24 is common
- Metal rings – to hold the chains in place
- Basket – typically made from wire mesh or metal rods
- Base – provides stability, often made from metal or concrete
Tools Required
Having the right tools ready will make construction much smoother.
| Tool | Use |
|---|---|
| Welder | To join metal components securely |
| Drill | For creating holes to attach chains to the basket |
| Saw | To cut the pole to the correct height if necessary |
| Wire cutters | For cutting mesh or chains to size |
| Measuring tape | To ensure accurate dimensions |
Designing Your Basket
Embarking on the exciting journey of building a frisbee golf basket puts creativity and resourcefulness to the test. Designing your basket is the first critical step, setting the stage for a functional and durable end product. It requires both attention to detail and a bit of imagination.
Dimensions And Specifications
A well-designed basket should meet official frisbee golf dimensions to simulate a realistic game experience. Here is a rundown:
- Target Zone: 52cm to 65cm in diameter
- Height: Basket rim should sit 82cm above ground
- Depth: Basket should be at least 21cm deep
Consider these specifications as a benchmark but personalize as needed.
| Component | Size |
|---|---|
| Target Zone Diameter | 52cm – 65cm |
| Height Above Ground | 82cm |
| Basket Depth | 21cm |
Visualizing The Final Product
Creating a visual representation of your basket before construction can save time and resources. Sketch or use 3D modeling software to plan out the design. Identify where each chain will hang, ensuring even distribution. Imagine your basket in the setting it will be used, whether a serene backyard or a more competitive environment.
- Sketch the design with accurate dimensions
- Decide on materials for frame and chains
- Plan for a base that keeps the basket stable
Building The Base And Pole
Embarking on the journey of creating a Frisbee golf basket brings us to a critical phase: Building the Base and Pole. These elements provide support and stability to your homemade basket. Let’s dive into crafting a solid base and selecting the perfect pole for your DIY project.
Creating A Stable Base
The base is the foundation of your Frisbee golf basket. To ensure longevity, focus on durability and stability. Follow these steps to create a base that stands strong against the elements and the excitement of the game:
- Choose a heavy material like metal or wood.
- Cut the material into a wide circular shape for even weight distribution.
- Even out the surface to prevent wobbling.
- Add weight, such as sandbags or concrete, for extra sturdiness.
Selecting And Preparing The Pole
The pole serves as the backbone to your Frisbee golf basket. It must be sturdy, straight, and the correct height. Consider these tips:
- Opt for a rugged material like galvanized steel or aluminum.
- The pole should measure around 54 inches in length.
- Ensure a snug fit into the base with appropriate fasteners or welding.
- Prepare the pole by cleaning and applying a rust-resistant coating if necessary.
Credit: chascrazycreations.com
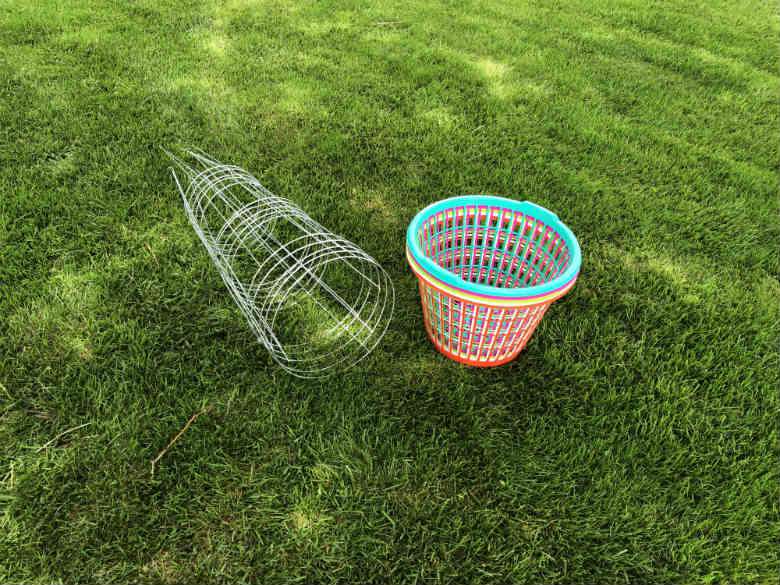
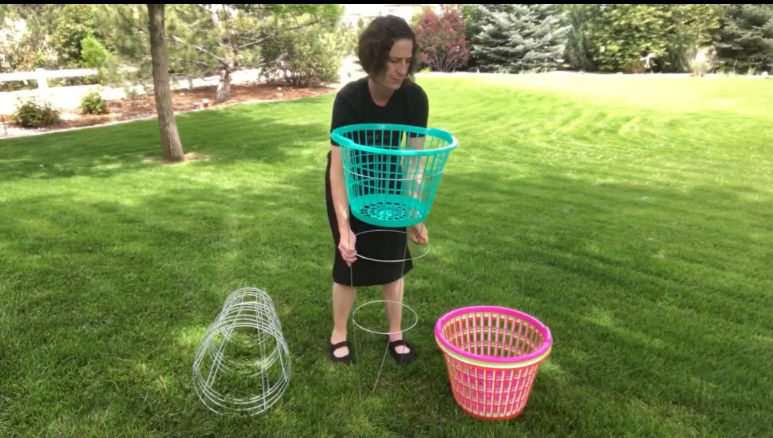
Assembling The Basket Portion
Creating the basket portion is a vital step to crafting a Frisbee golf basket. It captures the Frisbee, signaling a successful throw. The process involves precision cutting and shaping the metal, followed by welding for durability. A well-assembled basket should withstand the elements and the test of time. Follow these step-by-step instructions to ensure your basket is ready for action!
Cutting and Shaping the MetalCutting And Shaping The Metal
To begin, choose a robust metal that can endure outdoor conditions. Cut the metal to create the outer ring of the basket.
- Select a metal sheet or wire mesh that matches the standard dimensions of a Frisbee golf basket.
- Measure and mark the appropriate lengths for your basket’s circumference.
- Use a metal cutter or heavy-duty wire cutters to cut the metal pieces.
- Shape the cut metal into a circle that will become the basket’s outer edge.
Ensure all edges are smooth to avoid injury and to provide a clean, professional look.
Welding Techniques for DurabilityWelding Techniques For Durability
Secure connections are critical for the longevity of your Frisbee golf basket. Learn basic welding techniques to join metal parts permanently.
- Set up your welding equipment following the manufacturer’s instructions.
- Position the metal shapes accurately to ensure proper alignment.
- Weld joints together where the end of the metal mesh overlaps, to create a firm hold.
- Inspect welds for any gaps and re-weld if necessary to prevent disc entrapment.
Welding safety is paramount. Wear protective gear, such as a welding helmet, gloves, and apron.
Adding Chains And Targets
Frisbee golf, or disc golf, is an outdoor sport that blends the precision of golf with the fun of frisbee. The target of the game, the disc golf basket, is a crucial component. Of all its parts, chains and targets are vital for catching the discs. By creating your own basket, you can enjoy this sport in your backyard. Let’s dive into how to add chains and targets to your homemade disc golf basket.
Determining the Number of ChainsDetermining The Number Of Chains
To start, assess how many chains you’ll need. A standard basket includes 12 to 18 chains. A sufficient number is important for properly catching discs. Consider using lighter chains for a more budget-friendly option. The ideal setup consists of inner and outer chains for the best catching ability.
- Outer chains: Place approximately 12 chains even spaced around the basket’s circumference.
- Inner chains: Hang around 6 chains, spaced closer to the center pole.
Securing Chains To The Structure
After determining the number, you’ll need to secure the chains. For this, prepare S-hooks or zip ties to attach the chains to the basket. The top of the basket is where most of the work happens. A strong metal ring or a modified bike tire rim can work well for this purpose.
- Attach the outer chains to the metal ring, ensuring even spacing.
- Fasten the inner chains to a smaller ring or directly to the center pole.
- Adjust the length of each chain to right level.
- Each chain should hang so it slightly brushes against the basket walls for optimal catching.
Chain installation is a simple process but requires attention to detail. Regular testing and adjusting of the chain length may be necessary. The goal is a chain layout that provides a challenging yet fair way to score for players.
Finishing Touches
As the construction of your homemade Frisbee golf basket wraps up, it’s crucial to focus on the finishing touches that will ensure both beauty and functionality. These final steps involve safety considerations, personal customization, secure installation, and proper anchoring. Paying attention to these details transforms your DIY project into a lasting source of outdoor fun.
Safety And Customization
To ensure everyone enjoys the game without any hiccups, prioritizing safety is key. File away any sharp edges on your basket, and make sure all components are securely attached. After safety, add a personal touch! With customization, the options are endless:
- Paint the basket in vivid colors
- Attach decals or stickers
- Wrap the pole with durable tape for grip and design
Customizing not only makes your basket stand out but also displays your creative flair.
Installation And Anchoring
Installation is the final, critical phase. Choose a level spot in your yard, park, or preferred playing area. Using a post-hole digger, create a hole deep enough to stabilize the pole but shallow enough to avoid underground utilities.
For anchoring, consider these methods:
- Concrete – For a permanent solution, set the pole in concrete.
- Sand – If temporary placement is needed, use sand for adjustable support.
- Sleeve – Install a ground sleeve so you can remove the basket as needed.
With the right installation and anchoring, your Frisbee golf basket will stand firm against the wildest of throws. Remember to regularly check for stability and perform any necessary maintenance.
Testing And Maintenance
Creating a homemade frisbee golf basket is only the beginning. Once complete, it’s important to ensure your basket performs well and stands the test of time. Testing and maintenance are crucial for the longevity and functionality of your DIY project. Let’s dive into how to properly test your frisbee golf basket and keep it in top shape.
Initial Testing PhaseInitial Testing Phase
Right after assembly, it’s time for the initial testing phase. This step cannot be skipped. An effective test ensures that every throw counts and your basket is up to par with professional standards.
- Check for stability: Ensure that the base does not wobble and the structure stands firm.
- Test the chains: Gently toss discs to see if the chains catch properly without tangling.
- Assess durability: Apply slight pressure to various parts to simulate wind and physical strain.
- Make adjustments: Tighten any loose bolts and reinforce any weak spots identified.
Ongoing Care Guidelines
A well-maintained frisbee golf basket delivers consistent performance. Stick to these ongoing care guidelines to ensure lasting quality.
- Regularly inspect all connections and the integrity of the chains.
- Clean the basket to avoid rust and dirt buildup, especially if it’s outdoors.
- Check for wear and tear on the catching area and the poles.
- Store properly when not in use, particularly during extreme weather conditions.

Credit: m.youtube.com
Frequently Asked Questions For How To Make Your Own Frisbee Golf Basket
Can You Build Your Own Disc Golf Basket?
Yes, you can build your own disc golf basket using materials like PVC pipes, metal rods, and chains.
How Do You Make A Frisbee Golf Disc?
To make a Frisbee golf disc, start by choosing durable plastic, like polypropylene. Heat the plastic and pour it into a disc-shaped mold. Allow the disc to cool and solidify. Remove excess plastic for a smooth edge. Balance the disc for accurate flight by ensuring even weight distribution.
How To Make A Disc Golf Rack?
To make a disc golf rack, first gather materials like PVC pipes, mesh netting, screws, and joints. Cut the PVC to desired frame dimensions for holding discs. Assemble the frame using joints and secure with screws. Attach the mesh netting for disc slots.
Ensure stability and mount to the wall.
How Many Chains Are In A Disc Golf Basket?
A standard disc golf basket contains 12 to 24 chains, arranged in an inner and outer layer for catching discs.
Conclusion
Crafting your own frisbee golf basket can be a rewarding DIY project! With the right materials and tools, you’ve learned it’s possible to assemble a sturdy, functional basket. Whether for practice or casual games, your homemade basket is sure to provide hours of enjoyment.
Remember, persistence and creativity are key. Grab your discs, invite friends, and enjoy your handiwork out on the course!