To make a frisbee with paper, fold a large sheet into a sturdy, circular shape. Secure the edges to maintain the frisbee’s form during flight.
Crafting your own paper frisbee is a fun and easy project that’s perfect for a quick playtime accessory. Whether you’re indoors or in the comfort of your backyard, a paper frisbee can provide hours of simple entertainment. Using materials readily available at home, you can create this flying disc with a few folds and a bit of creativity.
Ideal for kids and adults alike, making a frisbee out of paper fosters both craft skills and physical activity. This activity not only promotes eco-friendliness by upcycling paper products but also serves as a light-hearted introduction to aerodynamics. Join us as we guide you through the steps to design your very own flyable masterpiece with just some paper and enthusiasm.
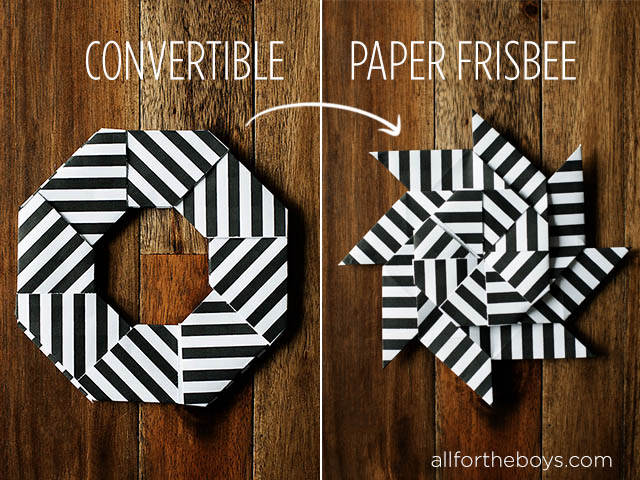
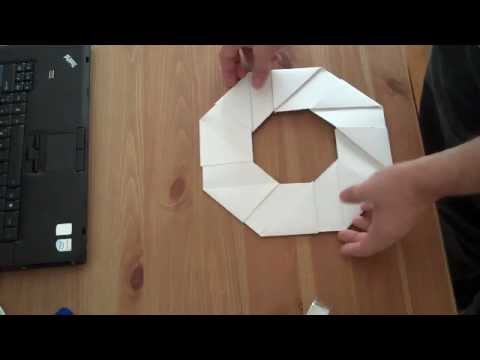
Credit: allfortheboys.com
Crafting A Homemade Frisbee
Let’s dive into crafting a homemade Frisbee! If you’re up for some fun DIY action, you’ll love turning a piece of paper into a soaring disc. It’s a perfect project for a creative afternoon and all you need are a few simple items from around the house. Ready to make your very own paper Frisbee?
Choosing The Right Paper
The key to a great Frisbee is the right kind of paper. You’ll want something that’s sturdy yet flexible. Think along the lines of a light cardboard or heavy construction paper. A thicker paper maintains its shape better and flies smoother through the air. You can even recycle an old cereal box or use cardstock for this project.
Essential Tools And Materials
To start your Frisbee project, gather these tools and materials together:
- A sheet of thick paper or light cardboard
- Scissors for cutting
- Compass or a large round object to trace a circle
- Markers, crayons, or paint for decoration
- Glue stick or tape to secure the form
With everything at hand, you’re set to create a fun paper Frisbee that’s uniquely yours. Follow these simple steps and watch your creation fly!
Designing Your Paper Frisbee
Welcome to the creative corner where simple sheets of paper transform into soaring discs! Making a paper frisbee is not only a crafty adventure but also a lesson in aerodynamics. Let’s shape and style a one-of-a-kind paper frisbee with steps that are easy to follow.
Deciding On The Shape
The shape of your frisbee is pivotal in determining how well it will fly. Most opt for the classic round design, known for its balanced flight. For a unique spin, explore shapes like hexagons or octagons. Either way, symmetry is key. Below are shapes to consider:
- Circular: Traditional and reliable for smooth gliding.
- Hexagonal: Offers a bit of flair with a stable flight path.
- Octagonal: A fun variation that can still capture the essence of a frisbee.
The Impact Of Size And Weight
Size and weight dictate how the frisbee will behave in the air. A larger frisbee needs more force to fly but may cruise further. A smaller one is easier to throw but might not travel as far. Aim for a light but sturdy build for the best experience. Consider the following factors:
| Feature | Impact on Flight |
|---|---|
| Size | Bigger can fly farther with more force while smaller responds to a light toss. |
| Weight | Heavier may resist wind better; lighter can be less stable but easy to throw. |
Select a paper weight that gives your frisbee structure without being too heavy. Experiment with different sizes to find the perfect balance for your playing style.
Step-by-step Construction
Welcome to our ‘Step-by-Step Construction’ section:
Today, we’re crafting fun right from your very own home with just a sheet of paper! Transform any regular paper into a soaring masterpiece. Our guide will lay out simple steps to make your very own paper Frisbee. Get ready to fold your way to hours of amusement!
Cutting The Paper
First things first, shape your paper for perfect flight. You’ll need:
- One sheet of A4 paper
- A pair of scissors
- A circle template or a compass
- Place your circle template on the paper.
- Trace around the edge to mark a perfect circle.
- Carefully cut along the line with your scissors.
You should now have a neat paper circle.
Folding Techniques For Stability
A stable Frisbee is a flyable Frisbee. We’ll fold to add strength. Follow these steps:
- Fold the paper circle in half gently.
- Unfold it to see the crease on your circle.
- Now, fold it in half again, along a new line perpendicular to the first.
- Unfold to see a cross crease pattern.
This ‘X’ pattern will be the guide for the next folds.
Next fold, fold each corner towards the center. It becomes a smaller circle now.
Assembling The Pieces
It’s time to put together our Frisbee. This is where magic happens. Carefully:
- Flip the folded circle over, so the folds face down.
- Tape across the folds to secure them in place.
Your paper Frisbee is ready to fly! Gently hold the edges and give it a toss.
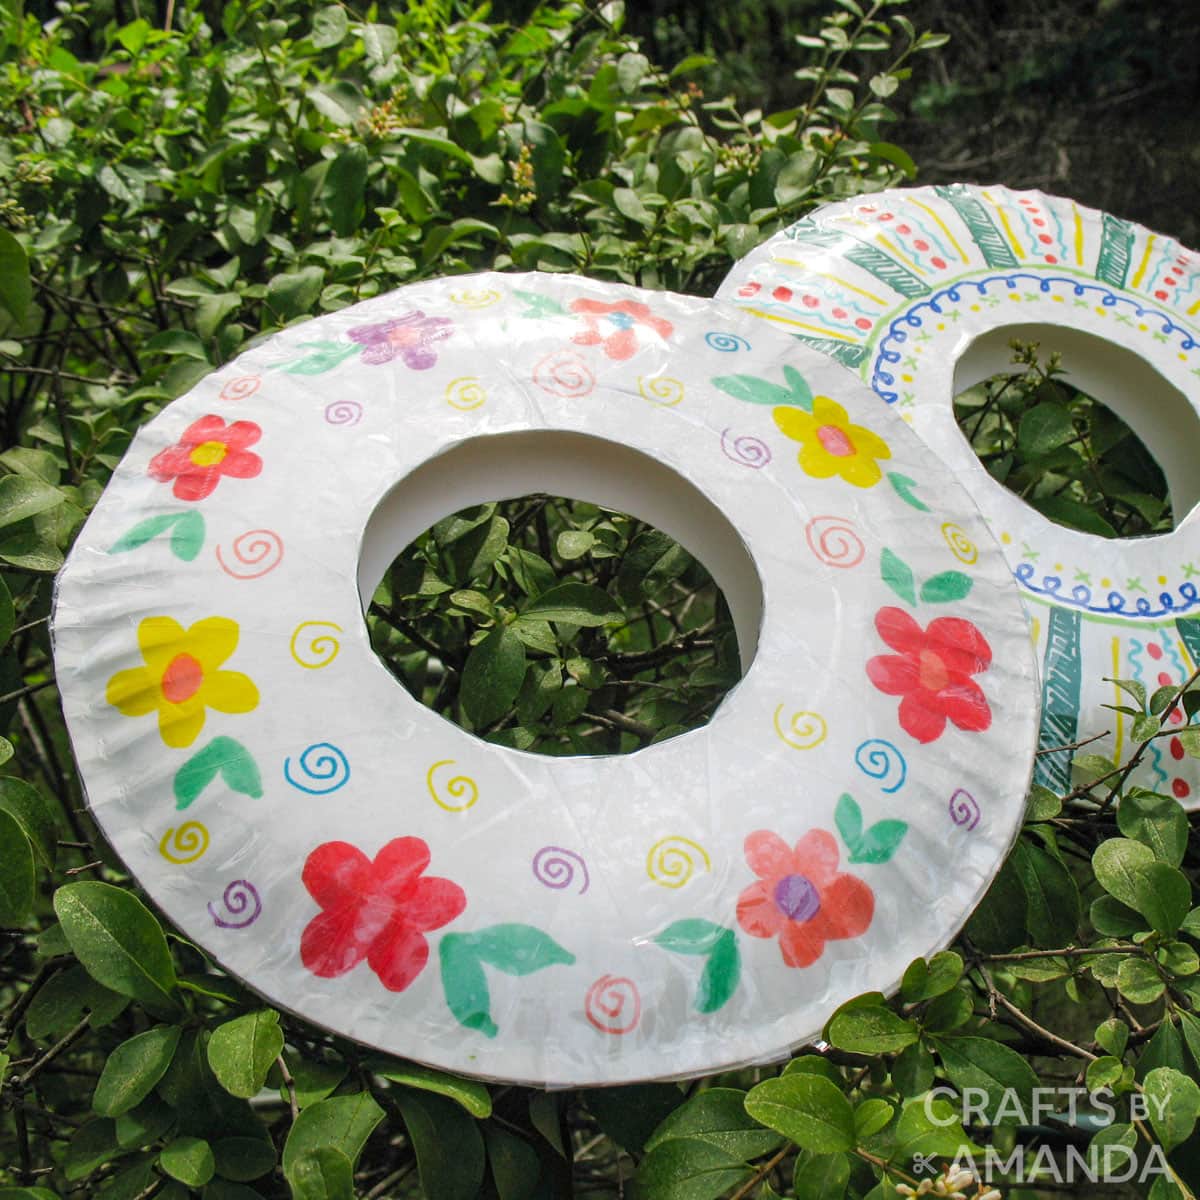
Credit: craftsbyamanda.com
Decorating Your Frisbee
Creating a paper Frisbee gives you the freedom to design a fun, unique toy. Once you have crafted the basic shape, decorating your Frisbee adds a personal touch. With colors, patterns, and a bit of creativity, you can make your paper Frisbee truly one-of-a-kind. Let’s explore how to turn your Frisbee into a piece of art that flies!
Creative Ideas For Personalization
Unleash your imagination as you decorate your paper Frisbee. Start by thinking about designs that reflect your personality or interests. Here are some creative ideas to inspire you:
- Draw your favorite cartoon characters or superheroes in action.
- Use stencils for precise shapes and patterns.
- Write inspiring quotes or your name in vibrant colors.
- Create a theme, like space or jungle, and decorate accordingly.
Tips For Durable Decorations
Since your Frisbee is made from paper, you’ll need decorations that last through games and weather. Here are tips for durable decorations:
- Use waterproof markers to avoid smudging.
- Apply a clear tape overlay for added protection.
- Seal with a decoupage glue for a glossy finish that endures.
Remember, the key is to use materials that will adhere to paper and withstand a bit of wear and tear. Happy decorating, and let your personality shine through your flying masterpiece!
Testing And Improving Your Frisbee
Making a paper Frisbee is fun. It involves creativity, precision, and a little bit of aerodynamics. Once the Frisbee is crafted, testing and improving its flight is key. Let’s learn how to send your paper creation soaring through effective testing and making necessary tweaks.
Conducting The First Flight Test
To start, find an open space. A field or a park works best. Hold the Frisbee with the thumb and forefinger at its center. Use a flicking wrist motion to give it a spin as you release it into the air. Watch how it flies and lands. Does it curve or drop quickly? Take mental notes.
Troubleshooting Common Issues
If the Frisbee isn’t flying straight, it might be unbalanced. Ensure that all sides are even. If it’s tilting or wobbling, the wings could be uneven. Flatten the Frisbee and align the edges again.
Modifications For Better Performance
Flying prowess can be enhanced with a few simple adjustments:
- Add weight: Tape a paperclip to the center to increase stability.
- Adjust angles: Bend the edges slightly up or down to control the lift.
- Resize wings: Trim the wings for better spin and speed.
Test the Frisbee after each change. Note the flight’s improvement or need for more adjustments.
Safety And Environmental Considerations
Making a frisbee from paper can be fun. It’s important to stay safe and think about our planet. Here are some tips for both.
Safe Flying Practices
- Always aim high. Avoid throwing at people or animals.
- Watch for obstacles. Keep away from roads and breakables.
- Choose open spaces. Parks and backyards are the best.
- Be mindful of the wind. Windy days can make frisbees unpredictable.
Eco-friendly Disposal Of Paper Frisbees
Recycle your paper frisbee when it’s no longer usable.
Follow these simple steps:
- Tear the frisbee into small pieces.
- Check your local recycling rules.
- Place the pieces in your paper recycling bin.
Remember, throwing away is not the only option. Be creative! Use old frisbees for art projects or other crafts.
Credit: m.youtube.com
Frequently Asked Questions For How To Make A Frisbee With Paper
How Do You Make A Paper Plate Frisbee?
To make a paper plate frisbee, take two paper plates and glue their bottoms together. Let the glue dry completely before tossing your homemade frisbee.
How Do You Make A Frisbee For Kids?
Select a lightweight, durable plastic material. Mold it into a curved, disc shape for easy gripping. Ensure edges are smooth for safe handling. Decorate with bright, kid-friendly colors or patterns to enhance visibility and appeal. Test for balanced flight before use.
How Do You Make A Frisbee Out Of Cardboard?
To make a cardboard frisbee, first cut two identical circles from a sturdy cardboard box. Next, sandwich the two circles together, securing them with strong adhesive or tape. Finally, smooth the edges for a consistent shape and better flight.
What Material Is Used To Make Frisbees?
Frisbees are typically made from plastic, often polyethylene, polypropylene, or ABS material. These plastics offer the ideal combination of weight, durability, and aerodynamics for flight.
Conclusion
Crafting a paper Frisbee can be a delightful and creative activity for all ages. Embracing this eco-friendly approach not only sparks innovation but also encourages recycling. Remember, the key to a smooth flight lies in symmetrical folding. So grab some paper, and let your homemade Frisbees soar!