To build a Frisbee launcher, gather materials such as elastic bands, a wooden board, and a triggering mechanism. Next, assemble the base, construct the arm, and attach the trigger for launching.
Creating your own Frisbee launcher can be a rewarding DIY project and an exciting addition to any outdoor gathering or picnic. Not only does it offer a unique way to play with a Frisbee, but it also provides an opportunity to delve into some basic engineering and physics.
The process involves crafting a sturdy base to ensure stability, rigging a launch arm designed to hold and release the Frisbee, and setting up a reliable trigger system that will send your disc flying at the pull of a lever or push of a button. Whether you’re a hobbyist looking for a weekend project or a parent aiming to build something fun for the kids, a homemade Frisbee launcher could become the highlight of your outdoor activities.
Crafting The Ultimate Frisbee Launcher
Imagine launching Frisbees with the push of a button. Craft the ultimate Frisbee launcher and turn that dream into reality. This DIY project blends fun and gadgetry for enthusiasts of all ages.
The Allure Of A Mechanical Arm For Frisbee Fun
Why go mechanical? A motorized launcher brings precision and power. You can achieve consistent throws perfect for practice or leisure. It’s the touch of innovation your backyard games need.
Essential Tools And Materials
Before beginning, gather these essential items:
- Electric motor (12V or higher)
- Sturdy base (wood or metal)
- Arm mechanism (metal rod, PVC pipe)
- Elastic bands (for tension)
- Screws and bolts
- Wire and battery pack
- Remote control system
- Safety goggles
- Tools: Screwdriver, drill, saw, and wrench set
Note: Customize materials to suit your design.
| Item | Quantity | Description |
|---|---|---|
| Electric Motor | 1 | 12V or Higher for launching power |
| Arm Mechanism | 1 | Metal rod or PVC pipe for structure |
| Elastic Bands | Multiple | For tension and release power |
Laying The Foundation
Stepping into the world of DIY projects is always thrilling, especially when it’s about building something as fun as a frisbee launcher. First things first, a solid foundation ensures your launcher will stand the test of time and provide countless hours of amusement. Get ready to dive into the nitty-gritty of crafting a dependable structure for your very own backyard frisbee hurling machine.
Design Principles For A Sturdy Launcher
Crafting a frisbee launcher calls for a careful balancing act between strength and precision. Consider these points:
- Choose high-quality materials. Durability matters.
- Aim for a low center of gravity to prevent tipping.
- Ensure all parts fit snugly for maximum stability.
- Keep the design simple and functional.
- Leave room for adjustments and calibrations.
Assembling The Base Structure
A reliable base forms the core of your launcher. Follow these steps to assemble your base:
- Select a sturdy wooden board as the base platform.
- Attach metal or wooden legs at each corner.
- Secure the legs with bolts and nuts for a firm fit.
- Cross-brace the legs for extra support and balance.
Now, your frisbee launcher’s base is ready. Next, you will build the mechanism that sends frisbees flying.
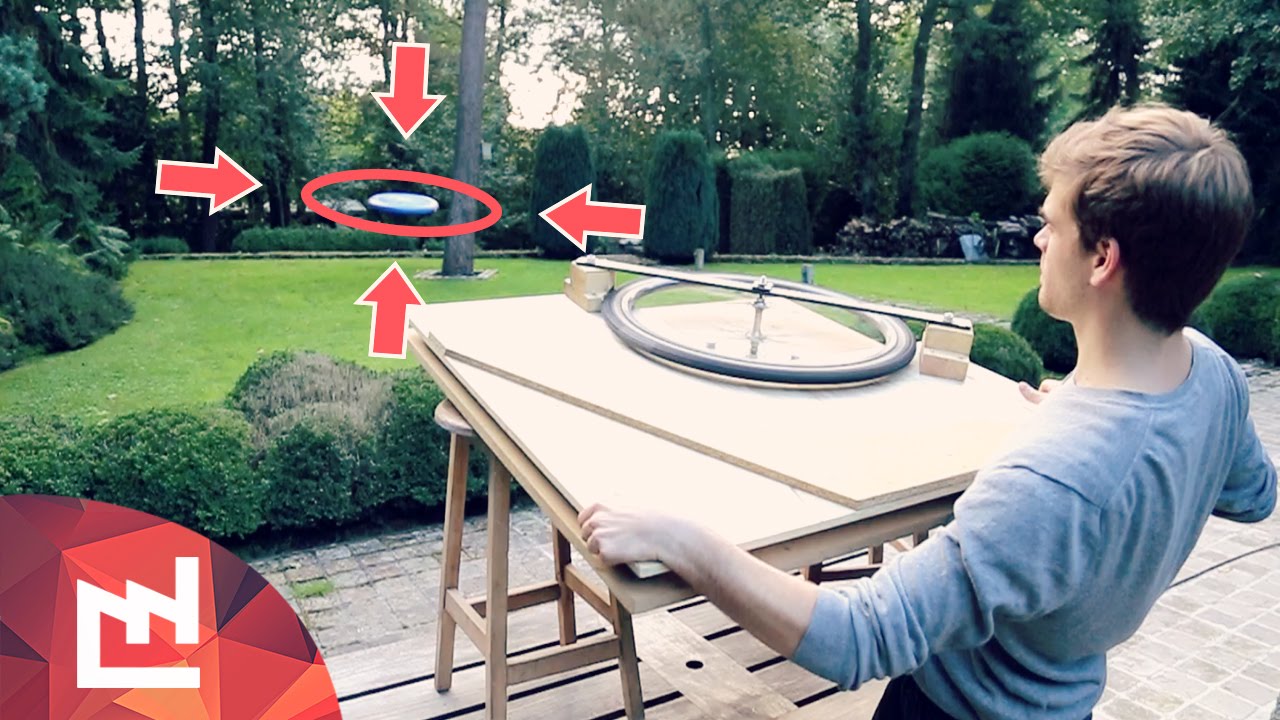
Mechanics Of The Frisbee Fling
The mechanics of the Frisbee fling spell magic for flying discs. To build a Frisbee launcher, you must understand the science behind a perfect throw. It’s all about using the right forces and angles. Let’s break down the core components that make a Frisbee sail through the air.
Understanding The Lever Arm Mechanism
The lever arm is your launcher’s throwing arm. Imagine a seesaw; it pivots and launches objects. Your Frisbee launcher works similarly:
- The lever length affects how far and fast the Frisbee flies.
- A pivot point allows the lever to swing swiftly and freely.
- Release timing is crucial for the flight path.
Aligning these factors ensures your launcher mimics the perfect Frisbee throw.
Selecting The Right Elastic Elements
Elastic elements act like muscles in your Frisbee launcher. They store energy and release it to fling the disc. Choose them wisely:
| Type | Energy Storage | Durability |
|---|---|---|
| Rubber bands | High | Varies |
| Bungee cords | Higher | Long-lasting |
| Spring systems | Variable | Very durable |
Select elements that can endure repetitive use and provide consistent force for repeated launches.

Credit: www.crunchlabs.com
Electronics And Automation
A key element in building an innovative Frisbee launcher is the Electronics and Automation system. This tech breathes life into your launcher, transforming it from a static structure to a dynamic, high-flying fun machine. At the heart of this metamorphosis is the integration of motors for powerful, consistent launches, and the clever wiring that holds the potential energy safely in check until the perfect moment of release.
Integrating Motors For Automated Launches
To automate your frisbee launcher, you’ll need reliable motors. These motors give your launcher the “muscle” to send frisbees soaring. Consider the following points for motor integration:
- Motor Type: DC motors are ideal for their simplicity and control.
- Torque: High-torque motors ensure your frisbee gets a strong launch.
- Speed Control: An adjustable speed setting allows for distance customization.
- Mounting: Secure the motor firmly to avoid any unwanted movement during operation.
Wiring And Safety Considerations
Properly wiring your launcher is crucial. It prevents accidents and ensures that every launch is safe. Keep in mind:
- Use insulated wires to reduce the risk of shorts and electrical hazards.
- Implement a fuse or a circuit breaker as a safety feature to protect your motors.
- Maintain neat wiring to avoid entanglements and operational interference.
- Use a switch or a remote control for safe operation from a distance.
Calibration And Testing
Once you’ve built your Frisbee launcher, the next crucial step is calibration and testing. This ensures that your launcher will send Frisbees flying accurately and reliably. Without proper calibration, you won’t be able to control the direction and distance of your throws. Now, it’s time to fine-tune your machine.
Finding The Perfect Tension And Angle
Adjusting the tension and angle is key to a precise launch. Start with a moderate tension on the launcher arm and a 45-degree angle. This setup often provides a great balance of height and distance for your Frisbee.
- Increase the tension if the Frisbee falls short.
- Decrease the tension if the Frisbee flies too far.
- Adjust the angle for wind conditions and target direction.
Make small changes and document the results. A table helps track these adjustments:
| Tension Level | Angle Setting | Distance Achieved |
|---|---|---|
| Low | 30° | Short |
| Medium | 45° | Medium |
| High | 60° | Long |
Conducting Trial Runs And Adjustments
With your initial settings dialed in, it’s time to conduct trial runs. Observe the flight path of the Frisbee. Is it stable? Does it reach the target area?
- Launch the Frisbee and watch the flight.
- Note any veering or instability.
- Make slight adjustments accordingly.
Continue testing and tweaking your launcher. Record each change’s impact on the Frisbee’s flight. Achieve consistent results before finalizing your settings.

Credit: blog.adafruit.com
Enhancing And Customizing Your Launcher
Enhancing and customizing your Frisbee launcher transforms a simple machine into a personal expression of creativity! It’s not just about sending a disc flying; it’s about making a statement with style and precision.
Adding Flair With Paint And Decorations
Unleash your inner artist by bringing a splash of color to your launcher. Start with a primer that will help the paint stick, and then go wild with your favorite shades. Here’s a simple guide to make your launcher stand out:
- Choose non-toxic paint suitable for the launcher’s material.
- Apply a base coat for even color.
- Tape off areas you don’t want to paint for clean lines.
- Add stickers or stencils for designs.
- Finish with a clear sealant to protect your work.
Incorporating Features For Precision And Power Control
Precision and power control turn a good launcher into the ultimate playmate. Consider these additions to fine-tune your launching experience:
| Feature | Function |
|---|---|
| Adjustable angle | Tweak the trajectory for different distances. |
| Variable power settings | Control the force for a gentle toss or a powerful launch. |
| Hand grip | Ensure comfort and a firm hold during use. |
| Rubber stoppers | Stabilize your launcher on any surface. |
For more intricate upgrades, gearing up with a spring mechanism or elastic bands can offer an extra boost. Practice with various tensions to find the perfect launch power for your frisbee.
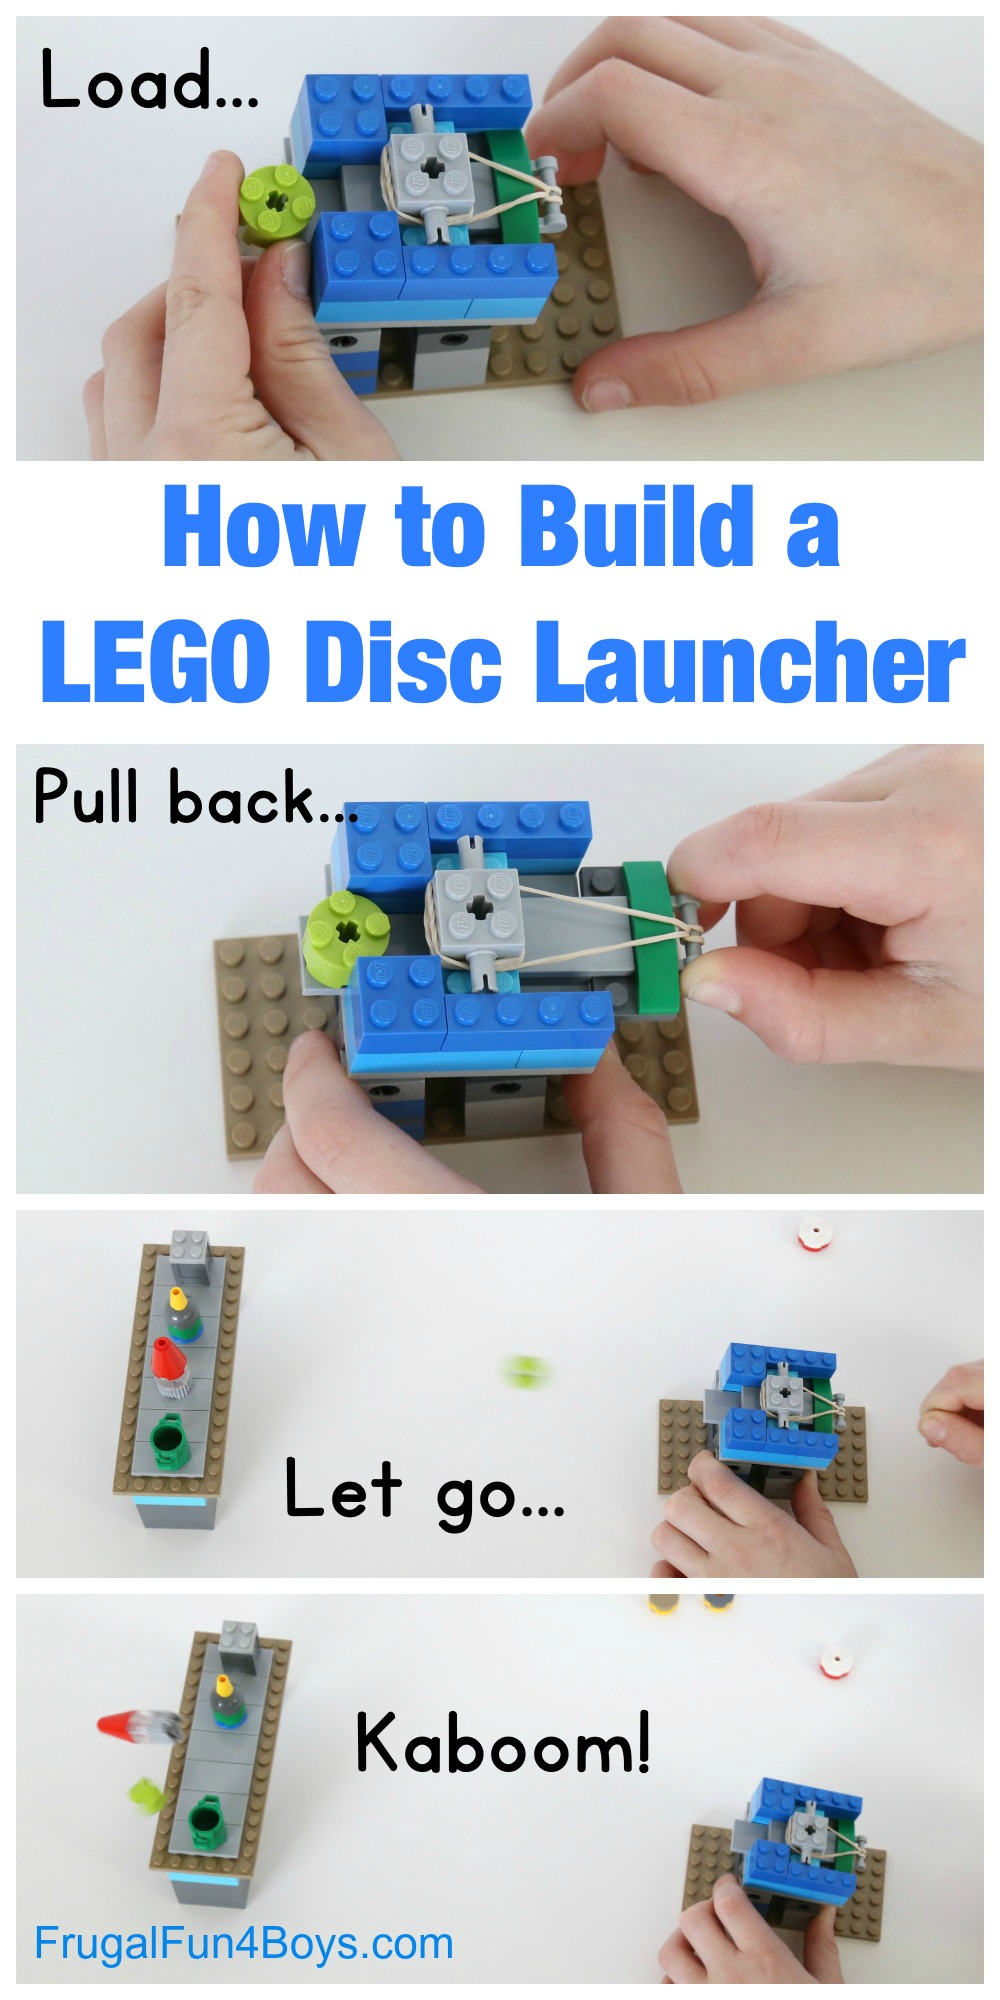
Credit: frugalfun4boys.com
Frequently Asked Questions On How To Build A Frisbee Launcher
How To Make A Disk Launcher?
To build a disk launcher, gather materials such as a plastic bottle, rubber bands, scissors, and a balloon. Cut the bottle’s neck off, stretch the balloon across the opening, secure with rubber bands, and place a disk inside to launch.
How Do You Make A Homemade Frisbee?
To make a homemade Frisbee, find a durable plastic lid or plate. Trace a circle using heavy cardstock, cut it out, then tape it inside the lid for added weight and stability. Ensure the edges are smooth for proper flight.
How Do You Make A Frisbee Out Of Cardboard?
Cut a circle from a piece of sturdy cardboard. Smooth the edges to create an even rim. Bend slightly upward along the rim for better flight. Decorate as desired, keeping it balanced. Always ensure safety during play.
What Is Frisbee Launcher?
A Frisbee launcher is a device designed to automatically throw Frisbees consistently, often used for dog training or recreational activities. It offers hands-free operation and adjustable launching distances.
Conclusion
Crafting your own frisbee launcher can be a fulfilling DIY project. With the right tools and a bit of patience, you’ll be launching discs like a pro. Remember, safety is key—always test your creation in an open space. Get ready to impress friends with your homemade launcher at the next outdoor gathering!